Monday, November 24, 2008

Seattle Wedding = Rain. Right?

Getting married in Seattle caused me to think thoughts of rain, rain, and more rain. Weather.com informed me that October in Seattle has an average of 13 rainy days per year, which meant my chances of rain might be close to 50%. I saw this picture by Laurence Kim and I knew I wanted to make sure and have umbrellas for guests to hold so we wouldn't be taking photos huddled under buildings if the skies opened up.


I love that the bride and groom provided these as favors!

I searched on ebay looking for "lots" of umbrellas, but I wasn't having much success. Then I decided to give google shopping a try (I think it used to be called froogle). Just go to google.com, and look in the top left corner. Click on shopping and type in the box what you are shopping for. It will bring back results (with prices listed) from all kinds of websites, cutting down on your time searching all of the sites individually. On the bottom of the screen you can refine your search by store, price, etc.

I found a great deal on umbrellas through CandR Elite Wholesale, and after hemming and hawwing for a few days decided to give them a try. The price was great at $2.55 each, but I was nervous that the quality would be subpar. I am pleased to say that the quality was very good, and IF it had rained, my guests would have been well taken care of.

Of course, the weather looked something like this all day long:

Bridesmaids Bree and Kee enjoying themselves in the sun.

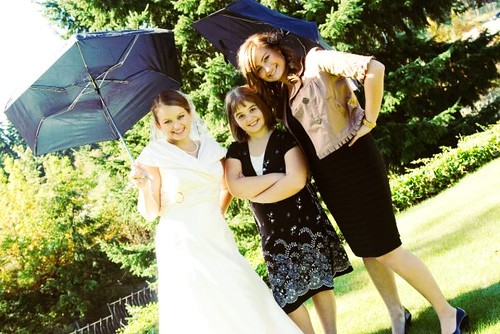
That doesn't mean we didn't end up getting some use out of the umbrella investment. MOH Shay had hauled them all the way from the parking lot for me, so I called her over and told her to pose in some photos with me. Cousin Charlie posed all sweet with us.


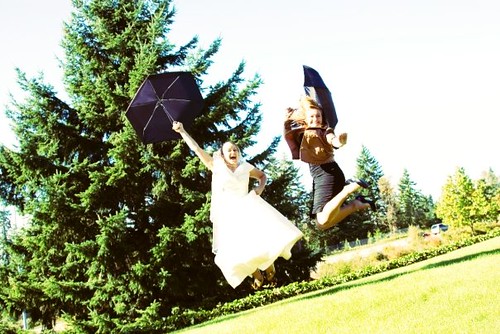
The things got crazy and the jumping began. Have you tried jumping in your wedding dress, on soft grass, in heels?


Each time we landed we had to extract our heels from deep inside the grass.


We ended on a Rodney Smith kind of a note.


I definitely need to figure out what to do with the 15 umbrellas we have left over. Did you make conditional wedding purchases that might not get used? What do you plan to do with them after the wedding if they don't?

Sunday, November 23, 2008

Photo Texturization Tutorial

Dear Editors. Please link pack my "photoshop screenshots" to the original large images! Thanks!

Mr. Avocado hates photos that aren't clean, crisp, and vibrant. I, on the other hand, can't get enough of fine art texture processing. One of my favorite photographers, Timwill, does such a beautiful job texturing his photos:


I did some photo texturing of my own for the RSVP postcards and our postcard guestbook and today I am going to show you how to add "textures" to photos using a photo editing software that works with layers, in this case, Photoshop. A free trial of Photoshop can be downloaded here. I imagine you can do the same thing with the free editing program, Gimp.

Before you can do this, you need some textures. My flickr album of textures, can be found here. Please help yourself! Many of these textures are from Europe, but some of them are from the parking garage where I used to live in Utah. I guarantee that you can find at least 10 just in your house. Just walk around wherever you are and collect closeup shots of different textures like I have over the past few months.

*Please click to enlarge all "Photoshop demonstration" photos in order to better read the text on the screen shot.*

I looked through my folder and chose this texture:


And this photo of Krakow:


Step 1:
Open up both photos in Photoshop.


Step 2: Make sure that the "Move" tool is selected (the red arrow is pointing to it). Click on the texture photo, hold down your mouse, and drag the texture photo on top of the photo you want to texturize (in this case, my photo of Krakow). Let go of your mouse, and look in the bottom right corner of your screen. You should now see two different "layers", one that says Background, and one that says Layer 1. Make sure Layer 1 is selected and click and drag on your photo to center Layer 1 on top of the Background layer.


Step 3:
With Layer 1 selected, look in the bottom right hand corner again and click on the blue arrow to access the pop-up box (the red arrow is pointing to this box). These options are "blending modes" and will allow you to create the textured effect.


Step 4:
I chose "Overlay" which is my favorite option, and look what happened to my photo!


Step 5:
I would like the colors to be a little less vibrant, so with the Background layer selected (the bottom arrow is pointing to it), I went to Image-->Adjustment-->Color Balance from the menu options at the top of the screen. The box that the upper red arrow is pointing to should appear. Dragging the sliders around will affect the color of the photo.


Step 6:
"Antiqued" photos usually also have a de-saturated appearance, so I went to Image-->Adjustments-->Hue/Saturation and dragged the sliders around to affect the vibrance of the image.


This is what I have so far.


Step 7:
The texture is a little heavy, so I selected Layer 1, and clicked on the arrow next to the word Opacity (the red arrow is pointing to it). I dragged the slider to the left to take the opacity of Layer 1 down, while leaving the opacity of the Background layer at 100%.


This is really where the tutorial ends, and you will just have to keep playing with things until you get the look you want.

Something I learned while texturizing was that the color of the photo you are dragging on top of your original image can directly affect the results. I took this yellow-ish texutre and dragged it on top of my composition.


And it gave me a much more "antique" look.


I then decided to get all crazy and test out this texture I collected at the Coliseum in Rome.


Not something you could use every day, but it might turn out really cool if you "created" a graffiti texture that included a heart, your wedding date, and other significant text and symbols and used it for a Save The Date.


Here are a few Before & After shots of photos I texturized and used for our Postcard Guestbook.


I never had the chance to use this photo anywhere, but it is definitely one of my favorite photos from our trip to Poland!


I'm not a photoshop expert, but feel free to ask your questions in the comments. I, or someone else, should be able to answer them for you. Good luck with all of your "texturizing"!

Thursday, November 20, 2008

DIY Bouquet (The Good, The Bad, The Ugly)

Wanna hear something crazy? I paid $28 total for the flowers at my wedding*. How I could I accomplish a feat so magnificent? Because the bouquet you see me clutching was the only floral element present the entire day!


I was going to go with a florist, have it delivered, and make things easy. Except I couldn't find anyone that didn't want to charge me $100+ for a silly bouquet! I've always loved walking past the rows and rows of flowers at Pike's Place Market and decided to be brave and assemble my own bouquet. I made sure to pack everything I would need and have it with me at the hotel (floral tape, scissors, pins, and ribbon). Remember to bring a vase with you to store the flowers in if you decide to go the DIY route! I forgot this little detail, but of course the fantastic Hotel 1000 had one delivered right up to my room when I asked.

The evening before the wedding Suavocado and I walked over to Pike's Place to pick out something. I walked up to one of the stalls, saw some white flowers (what are they, Dahlias? Mums?) and said I wanted the whole bunch of them. The girls working the flower booth even gave me a few things for free since it was closing time! I picked out a few different extra things, thinking I would incorporate a few different elements. Turns out this was a mistake since I had no idea what I was doing. If you haven't practiced, and you aren't crafty like myself, just decide to make a bouquet out of one kind of element. The flowers I ended up using really only cost me around $12!

BM Princess Jess and I put the bouquet at around 9:00 the night before the wedding. She took all of the flowers, snipped the ends, and arranged them in a vase. She lifted the arrangement out of the vase and I tied floral tape around it. We wrapped a pretty iridescent ribbon around the stem and secured it with diamond head pins. It wasn't perfect but I was tired and ready to go to bed so we threw it in the vase and called it good.


This was not the prettiest bouquet you will ever see. This shot shows perfectly how absolutely uneven it was and you can see how some of the flowers are already pointing down.

In the end this was the best choice for me because I didn't have to stress about taking care of a $100+ investment. I still loved it and carried it around like a proud mama, but when it came time to take formals like the one below, and I wanted to put my arms around my grandmothers, I simply set (okay, tossed) it on the ground in front of me.


I think it was passed around from babysitter to babysitter while I ran around direction things. Papacado is the one you see holding it so nicely here.

Apparently over time I began to use it as a kind of traffic director.

"Hey you, yeah you, cousin X, get in that picture!"


"No, no no! I said bridesmaids should be standing over on that side!"


In the end, the bouquet served it's purpose. I was the bride. I had a pretty dress, a veil, a darling groom, and a bouquet. In shots like this one you can't even tell what a DIY disaster it was.

Kelli Nicole Photography

After the formal portraits at the temple I'm not sure what happened to it. It isn't in any of the bridal part shots, but someone did grab it and set it on the cake table that night. It looked really ragged by then so I gave it away to one of my little cousins. I had intended on giving it away to the oldest married couple in the room, which I think is such a wonderful tradition, but it was so bedraggled by that point I would have felt embarassed handing it over to someone as a gift!

*Although I still paid a good amount for the wedding decor in general, I saved a whole bunch by going the DIY route with non-floral decor. And I get to keep everything (for what purpose I have no idea) now that it is all over!

DIY Stick Based, Moss Covered, Feather and Crystal Centerpieces

Back when we visited the wholesale warehouse for our decor elements, I never thought we would wind up with this...


but I'm not that surprised since Mamacado is truly one of the craftiest people EVER! I don't have step-by-step photos of the process, since Mamacado and Friend Patti were a little busy assembling these just a few days before the wedding to take photos. I did manage to grab a few shots of the basic elements before they were assembled however, which should give you enough of an idea to recreate your own version if you so choose.

Supplies

1. Vases
We originally were going to create these mounds of floral foam covered with moss (it doesn't really make sense to me now either), but Mamacado stumbled on these "vases" for something like $2 each. We had lovely intentions of staining them a kind of bronze color, but that didn't happen, and I think they still look okay.


2. Sticks and Crystals
The crystals are threaded through a thin wire, and were purchased in a huge roll at the wholesale warehouse. We toyed with the idea of purchasing sticks at the warehouse, but the prices are insane! Instead Mamacado and Friend Patti headed out to a nearby abandoned orachard with some wood cutters and snipped away. They then cut lengths of crystal and wrapped them around the sticks.


3. Feathers and Mossy Sticks
The feathers and moss were both found at the wholesale warehouse. The feathers were stripped from their sets to make them go a little bit farther.


4. Sparkly Doodads
I wasn't a huge fan of these when we purchased them, but Mamacado insisted we needed some color and sparkle (she was right, as usual). They were also stripped down to smaller sections to be spread throughout the 12 centerpieces.


5. Moss
Several different kinds of moss were used, with this earthy, natural stuff being my favorite.


Assembly

Step 1: Insert floral foam (the soft kind that is fun to poke holes in) into vases.
Step 2: Poke crystal covered branches and moss covered branches into floral foam.
Step 3: Embellish with feathers and sparkly doodads (use hot glue gun when necessary to keep things stable).
Step 4: Use hot glue to cover the base with moss.
Step 5: Stand back and say "Look how pretty!"


The vases came pre-assembled, but there were still more centerpiece elements to be put together at the wedding so I created this little picture guide for my DOC to use.


My only advice in choosing centerpieces like this would be to make sure you have a way to transport them to the wedding! Mamacado and I are definitely glad that stressful experience is over. :)


Remember that these centerpiece elements were chosen as we scurried through the wholesale warehouse picking things out at random. If you want to re-create your own version it would be very easy to switch out some of the elements to make it look perfect for your own wedding!

Sunday, November 16, 2008

The Avocado BM Dresses

I've had several questions about the dresses my bridesmaids wore on the big day and so I thought I would write a post highlighting each bridesmaid and what she wore. You may remember that I at first attempted to dress my bridesmaids like clones of each other, but when it proved impossible to find 6 different modest dresses, in varying sizes, for the right price, I decided to let them choose their own. I mailed them each a check for $100 and told them over and over to choose something "fancy."

I had no idea what the majority of them were wearing until the day of, but I was shocked (in a wonderful way) at what they came up with!


I am telling the truth (although you won't believe it) when I say that BM Maggie sewed this dress with her mother the week before the wedding. She looked gorgeous in it, and I can't believe she made something that other girls are paying hundreds of dollars for!


I do not love this photo (why am I making that awful awkward face with one of my best friends?) but I love this outfit! BM Lova got all crafty on me in putting her outfit together. Her dress is from Macy's and she managed to round up a shrug that looked great on top. The crowning achievement is that brooch she fashioned. She told me she found a barrette at Rite Aid (of all places), ripped it apart, and attached it to her dress (her dress originally had a silver embelishment and I was pretty adamant that silver was NOT to be included if possible). The gold peep toes are adorable as well!


Again, more awkwardness from the bride in the poses. I should have hired some type of posing consultant for the big day. BM Princess Jess wore a black dress by Isaac Mizrahi (found at Target), a black cardigan, and finished it off with Isaac Mizrahi shoes (found at Saks). I love that she demonstrated how pairing high and low priced items can still look fancy.


BM Bree's dress was from Banana Republic, although you can find a very similar dress at Nordstrom. But who is looking at the dress when those fantastic shoes are in the shot?


I helped BM Beni Bop scout out this Calvin Klein rip-off on ebay. It was supposed to be the real thing, but after it came with no tags we realized it was probably a fake. Nothing a little dry cleaning couldn't fix though. Definitely a steal of a dress at $75 with shipping.


MOH Shay really spiced things up with this little number. It was from Nordstrom and she definitely came close to upstaging the bride while wearing it. I had to hold some of the groomsmen back by reminding them she hasn't even hit her 20's yet. :) I couldn't find the exact dress on the Nordstrom website, but this dress is very similar.

Would I do it this way again? Definitely. Letting the girls choose their own dresses, and pitching in to help them pay for them was a great way to do things. I think each of them felt confident and beautiful in their dress of choice, and their personalities really showed through in each of their outfits. If someone were to ask me for advice in how to achieve the right look I would tell them to give a few guidelines (I encouraged staying away from casual materials like cotton and encouraged things like taffeta or satin), send out reminders, and to help them in their search by giving them examples of what you like.

The most important thing would be to not set exact expectations for what you want, because likely your girls will fail you. They aren't mind readers you know. If you want something specific, go for something specific. However, if you are on a budget like me, and you know you will be able to embrace whatever look they come up with, go ahead and let your best girls find their own ways to look their best!